My daily work usually starts by opening an SSH connection to a server, running a docker image (with RStudio Server or Jupyter on it), and analyzing data or programming directly on the browser. It was always convenient like that until I got sudden disconnection last month. Suddenly anything stops working, and I wasted several hours hopelessly trying to fix it. When I went home, I figured out that the electricity in my apartment was very unstable due to a small construction upstairs. Of course, a simple solution is getting a UPS (Uninterruptible Power Supply), but I was fascinated by the idea that maybe I can turn on my server over the internet. That is like having the server’s power switch with me all the time. It would be so cool, especially when I’m away for an extended period and don’t want to waste money on the energy bills. This story is about how I’ve done it. You can have a look at my final network setup first.
Step 1: Satisfy hardware requirements
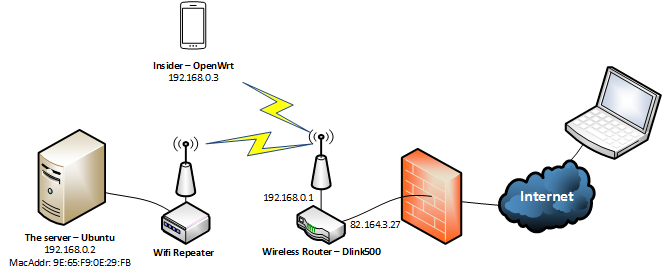
In most motherboards, there is a function called “Wake-on-Lan” (WOL). WoL works by sending a packet of data called a Magic Packet™ to a target machine. When the packet is received, the target machine’s network interface wakes-up the rest of the computer. However, I recognized that I cannot wake-up my server through its wireless interface (I’m using a USB wireless adapter). It turned out that the Magic Packet must be sent to the motherboard’s built-in Ethernet port since it’s the only thing awake when the whole machine off. I fixed the situation by using a Wifi Repeater, and connect it to the server through an Ethernet cable. You can skip this step if your machine is using a wired connection.
Step 2: Make Wake-On-Lan work on Lan.
As the name suggested, WOL is designed to wake-up a machine through a local network. So you have to be in the same network with your target device to make it work. In this step, we will try to do just that.
First, you have to turn on the WOL feature on your motherboard. Enter the BIOS setup and look for “ Wake up on PCI event” or “ Wake up on LAN” and enable it.
Second, on Ubuntu, you have to know your default interface, check if it supports WOL, and turn on the feature. The whole process can be done as following:
|
|
To make the setting sustains after rebooting, you need to add the last command above to the interface’s configuration in etc/network/interfaces. You can read more in here.
Now, let’s test it. You can use a mobile app called “Wake-on-Lan” in Android (there are similar apps for iOS, but I haven’t tested it). It can automatically scan your local network and list all of the connected devices. You just search for your machine, add it, and then you can send the magic packet to it whenever you want. Try to turn off your target machine and wake it up by your phone.
You can add the device manually if you know its mac address and broadcast address. They are 9E:65:F9:0E:29:FB and 192.168.0.255 in my case. You can use the ifconfig command to find out that information. Note that you will need your mac address to wake up your machine through the internet.
Step 3: Make Wake-On-Lan work through the internet.
Note that your router must have a static IP (e.g., 82.164.3.27) to complete this step. There are many solutions to send the magic packet through the internet. I’ve listed them below from the easiest to the hardest (sometimes the only) solution:
First solution: If your router supports forwarding the magic packet (Port 7 or 9 UDP), you are lucky. You can just forward any packet from port 7 or 9 UDP to your target device. Some routers even allow forwarding broadcast packet. You can use this website to wake up your server. However, as far as I know, most of the popular commercial routers do not support this (my case). Remember to make a DHCP reservation for your server, so that its IP will not change after reconnecting.
Second solution: You can check if you can install a better firmware for your router. For marketing purpose, many router producers hide functionalities on their products. You can install a third-party firmware to unlock all of these. I highly recommend the OpenWrt. Check if your router is supported by OpenWrt here.
Third solution: If your router is not that good, you will need an insider. It’s a device that is always on and connects to your local network. Then you can SSH to your insider over the internet and let it send the magic package for you. In my case, I use a cheap Raspberry Pi 3 (which I already use for controlling other things). I’m using OpenWrt on it, and run the etherwake command as following:
|
|
The first argument is the mac address of the target machine, while the second argument is the network interface of the insider that will send the package. It should be its default interface. You can check this link for more detail. Note that your insider can be any device, running any OS. As long as you can SSH to it through the internet, it should work. Remember to configure port forwarding for the insider’s SSH port, so that you can SSH to it from anywhere.
So, that’s it. I hope you enjoy the story. Leave a comment if you have any trouble following it.